Running a business in India comes with a plethora of responsibilities, and one of the most critical tasks is ensuring your business is GST compliant. Whether you’re a small startup owner or running a well-established enterprise, verifying your GST registration is not just a formality—it’s a legal necessity that can save you from future penalties and streamline your tax processes. In this guide, we will break down how to GST verify your business in 5 easy steps, using simple language and practical examples so even beginners can follow along.
What is GST Verification and Why It Matters
Before diving into the steps, let’s understand what GST verification really means. The Goods and Services Tax (GST) system in India is designed to simplify indirect taxation. However, businesses must verify their GST registration to confirm that their details are correctly recorded on the government portal.
Verification ensures that:
-
Your GSTIN (Goods and Services Tax Identification Number) is active.
-
Your business details like name, address, and legal status are accurate.
-
You can claim input tax credits without complications.
-
You avoid penalties for non-compliance or misreporting.
Moreover, GST verification protects your credibility with suppliers and customers, as they often check whether a business is legitimately registered before engaging in transactions.
Step 1: Gather Your Business Details
The first step in verifying your GST registration is to collect all the necessary business information. Accuracy here will save you time and reduce errors during the verification process. You will need:
-
GSTIN (15-digit number)
-
Legal business name
-
PAN number of the business
-
Registered mobile number and email linked to GST
-
Business type (Proprietorship, Partnership, LLP, Private Limited, etc.)
-
State of registration
It’s easy to overlook small details, but having everything ready beforehand ensures a smoother verification process.
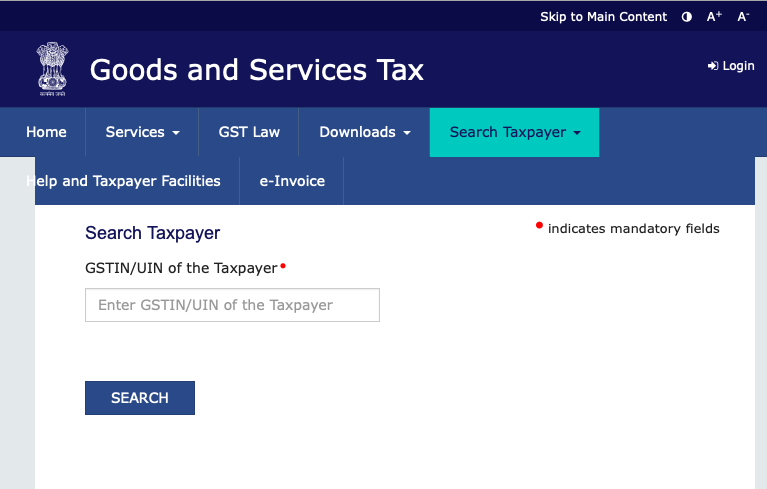
Step 2: Visit the Official GST Portal
Once your documents and information are ready, head to the official GST portal. Always ensure you use the legitimate government website to avoid scams or incorrect verification.
-
Go to www.gst.gov.in.
-
Navigate to the “Search Taxpayer” section.
-
Choose the relevant option (GSTIN/UIN or PAN).
Here, you can enter your GSTIN or PAN to check your registration status. The portal will provide real-time information about your business registration, compliance status, and whether your GSTIN is active or suspended.
Step 3: Verify Your GST Details
Now comes the actual verification. This step is crucial because any mismatch in details can lead to complications later.
-
Enter your GSTIN or PAN in the search field.
-
Fill in the captcha code for verification.
-
Click Search.
If your business is properly registered, the portal will display a detailed summary including:
-
Legal Name of Business
-
Trade Name (if any)
-
State of registration
-
Date of GST registration
-
GST status (Active/Inactive)
Check each field carefully. For instance, if your trade name is different from your legal name, ensure it’s correctly reflected. Any errors should be reported immediately to the GST helpdesk or your tax consultant.
Step 4: Cross-Check with GST Returns
Verifying your business isn’t only about confirming registration; you also need to check whether your GST returns are in order. Compliance with filing ensures your GSTIN remains active.
-
Review GSTR-1, GSTR-3B, and any annual returns filed.
-
Confirm that input tax credits claimed are accurate.
-
Match the sales and purchase details with your accounting records.
Regularly cross-checking these filings ensures your verification isn’t just a one-time task but a part of ongoing business compliance.
Step 5: Download GST Verification Certificate
Once you’ve confirmed that your GSTIN is correct and all business details match, it’s recommended to download the GST verification certificate.
-
On the GST portal, click on “Download Registration Certificate”.
-
Save the certificate in PDF format.
-
Keep a digital and physical copy for your records.
Having this certificate handy not only reassures your suppliers and clients but also acts as proof of your legal registration during audits or official checks.
Common Mistakes to Avoid During GST Verification
Even seasoned entrepreneurs make errors while verifying GST. Here are some pitfalls to watch out for:
-
Incorrect GSTIN Entry: Always double-check the 15-digit number. A single wrong digit can give inaccurate results.
-
Outdated Email or Mobile Number: Make sure your contact details linked to GST are current.
-
Ignoring Suspended Status: If your GSTIN is inactive, address the issue immediately to avoid penalties.
-
Mismatch in Legal Name and Trade Name: Ensure both are reflected accurately in GST registration records.
-
Neglecting GST Returns: Failing to file returns can lead to automatic suspension of your GSTIN.
Avoiding these mistakes can save your business time, money, and legal headaches.
Why Regular GST Verification is Beneficial
GST compliance is not a “one and done” task. Regularly verifying your GST registration provides multiple benefits:
-
Prevents Tax Discrepancies: Catch errors before they escalate.
-
Builds Business Credibility: Clients prefer verified, compliant suppliers.
-
Smoothens Input Tax Credit Claims: Accurate GSTIN ensures you can claim your credits without delays.
-
Avoids Legal Penalties: Timely verification keeps your business on the right side of the law.
Think of GST verification like a health checkup for your business—it ensures everything is functioning properly and avoids costly surprises later.
Tips for a Hassle-Free GST Verification
While the process is straightforward, here are some expert tips to make it easier:
-
Keep Digital Records: Maintain digital copies of GST certificates and returns.
-
Use Accounting Software: Modern tools can sync your sales and purchases with GST filings.
-
Set Reminders: Ensure you verify your GST every few months or after major business changes.
-
Consult Tax Experts: If you encounter discrepancies, a GST practitioner can resolve issues faster.
-
Educate Your Team: Make sure your finance team understands the verification process to avoid mistakes.
Frequently Asked Questions (FAQs)
Q1: How often should I verify my GST registration?
A1: It’s recommended to check your GSTIN quarterly and after filing any annual returns.
Q2: Can I verify GST without GSTIN?
A2: Yes, you can use your PAN to check registration details on the GST portal.
Q3: What happens if my GST verification fails?
A3: A failed verification indicates discrepancies. You must contact GST authorities or your tax consultant immediately to rectify it.
Q4: Is GST verification mandatory for all businesses?
A4: Yes, any business registered under GST must ensure its GSTIN and details are accurate.
Summary Table: GST Verification Checklist
| Step | Task | Key Points |
|---|---|---|
| 1 | Gather Business Details | GSTIN, PAN, legal/trade name, state |
| 2 | Visit GST Portal | Use official portal, avoid third-party websites |
| 3 | Verify Details | Check legal name, trade name, status, registration date |
| 4 | Cross-Check Returns | GSTR-1, GSTR-3B, input tax credits |
| 5 | Download Certificate | Save digital & physical copies |
Conclusion: Stay Compliant, Stay Confident
Verifying your GST registration might seem tedious at first, but once you get the hang of it, it becomes a simple, routine task that strengthens your business foundation. By following these 5 easy steps, you not only ensure legal compliance but also protect your business credibility, streamline tax claims, and avoid unnecessary penalties.
Take a few minutes today to verify your GST, and make it a habit to review it regularly. Your future self—and your accountants—will thank you.
About the Author